skip to content
Are you looking for support from US? GET SUPPORT
Sign out

Session expired

NEW IN VIDEOMANAGER 24.2 (q2 2024)

VideoManager 24.2 introduces multiple enhancements for in-car video system configuration.

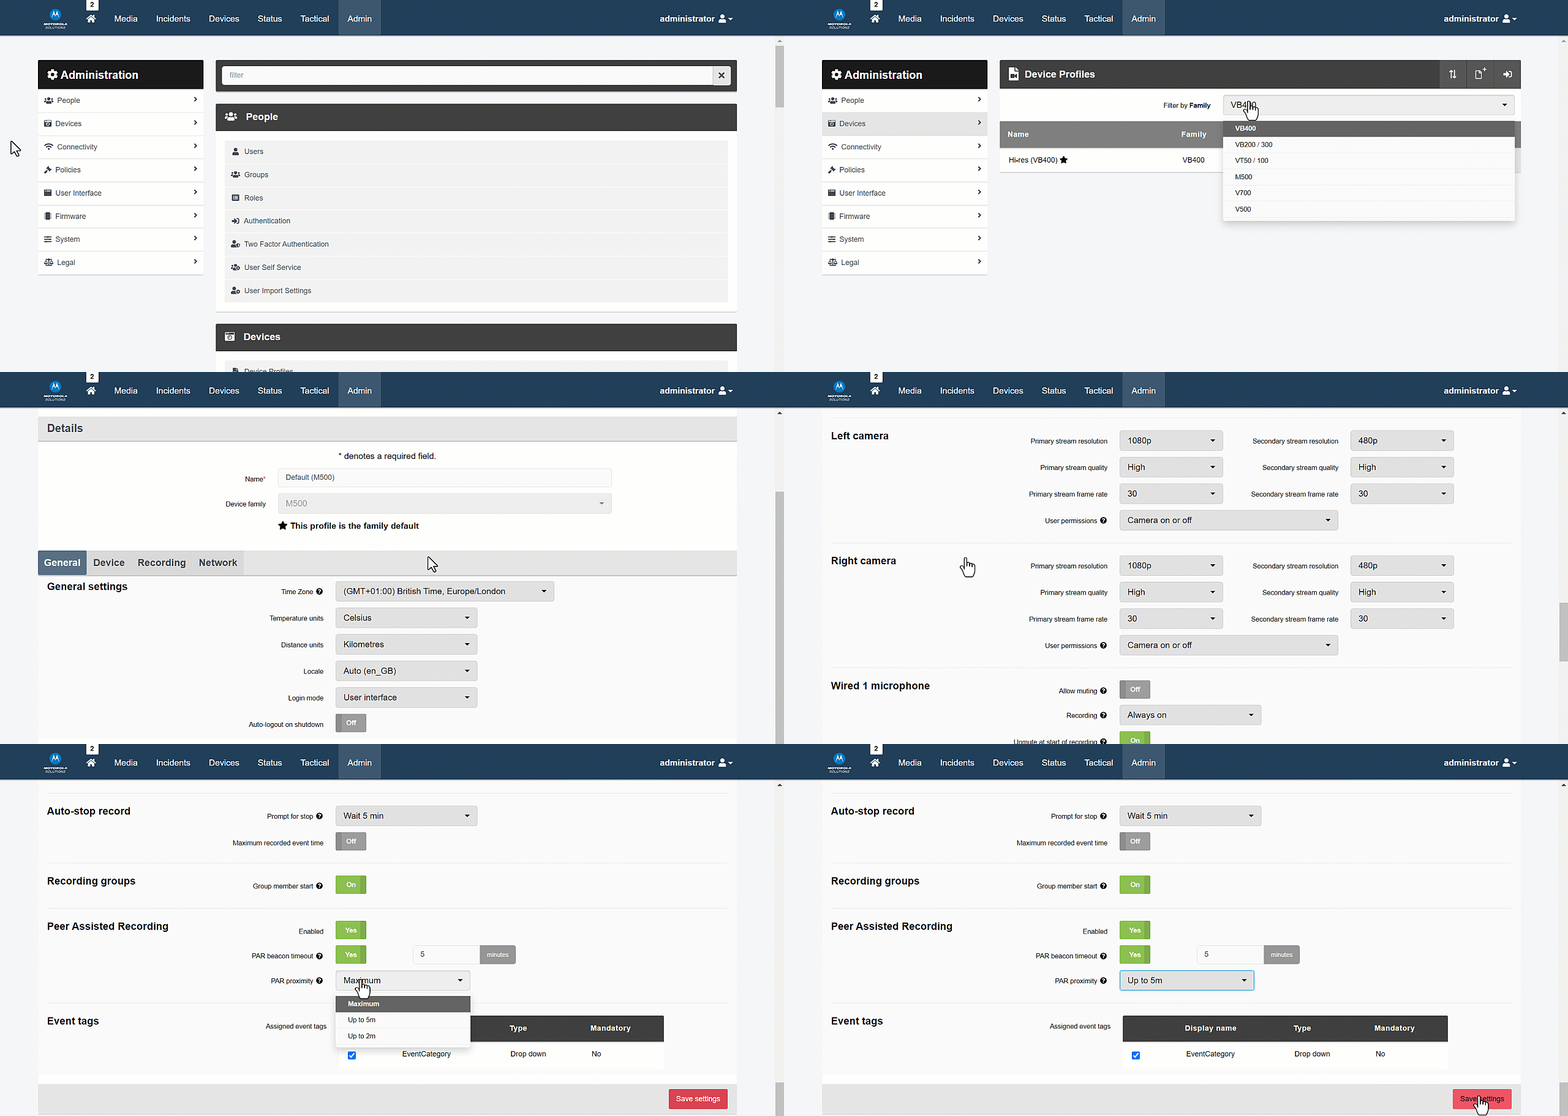
M500 PEER-ASSISTED RECORDING

Trigger your M500 to start recording as soon as another recording VB400 body camera or M500 comes into range. To configure this feature:

  1. Navigate to the Admin tab.

  2. Select the Devices pane.

  3. Click the Device Profiles section. 

  4. Click Go to profile next to the relevant M500 profile.

  5. Click the Recording tab.

  6. Scroll down to the Peer Assisted Recording section, and set Enabled to Yes. Optionally set a beacon timeout (after which no body cameras or in-car video systems will be triggered to start recording) and a proximity (outside of which no body cameras or in-car video systems will be triggered to start recording).

7. Click Save settings.
 

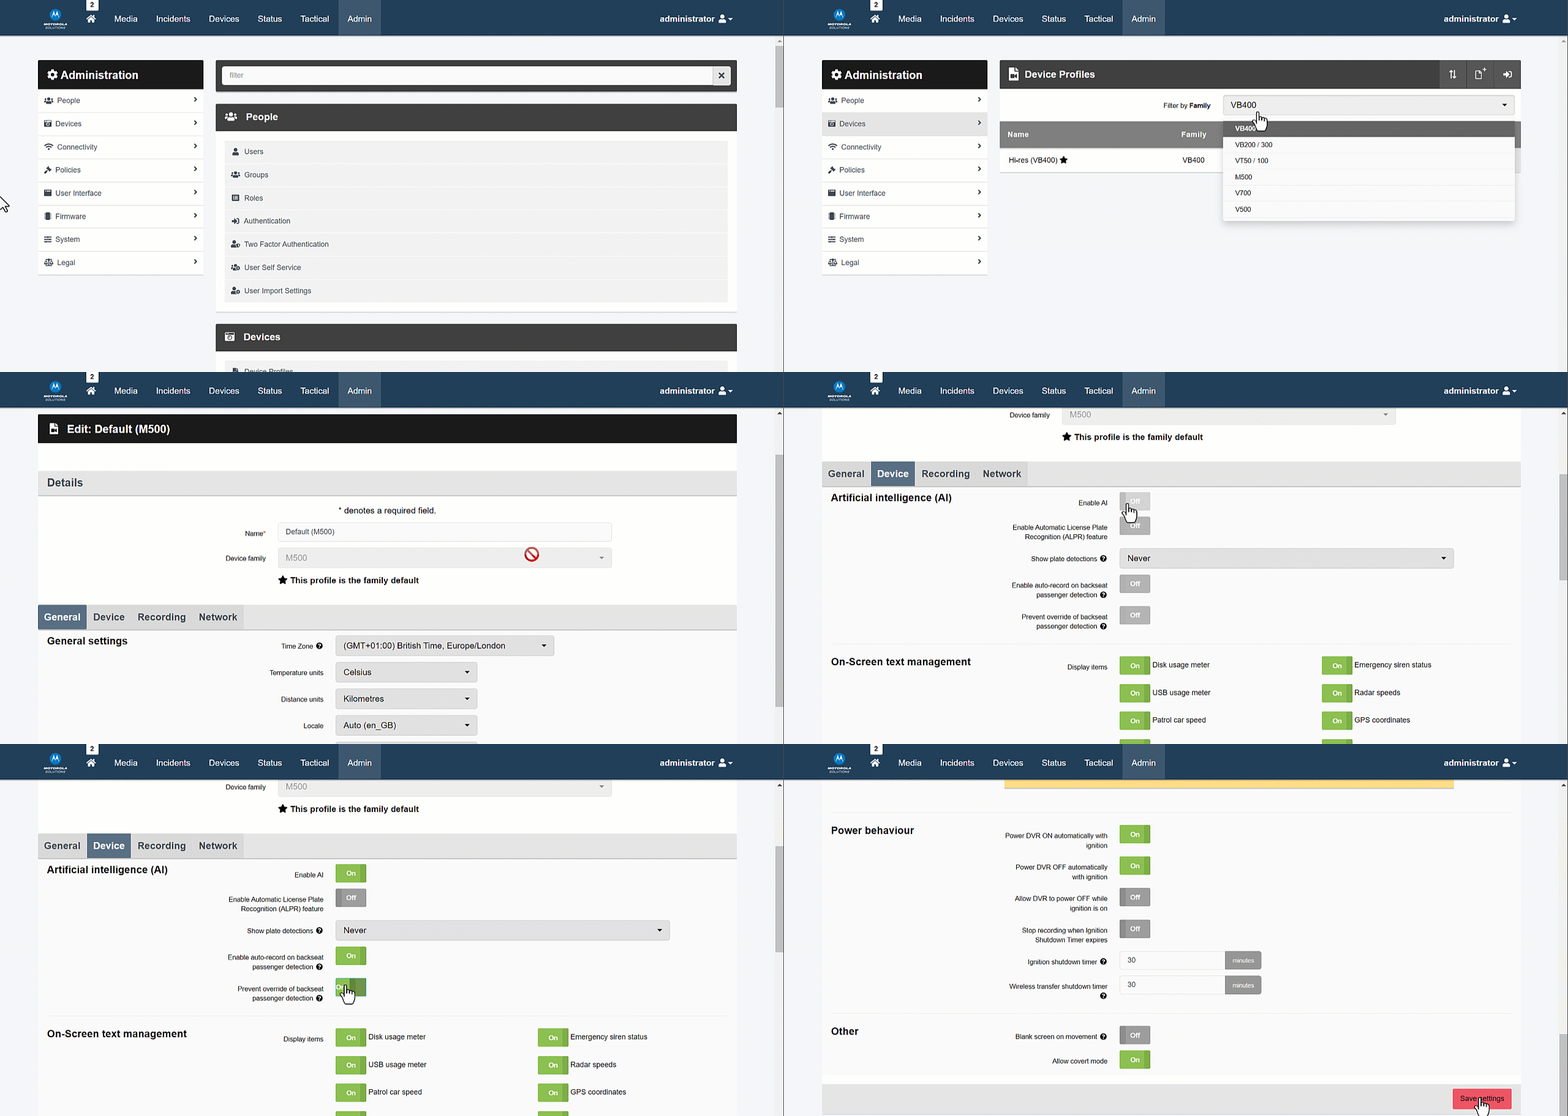
ENFORCE M500 BACKSEAT DETECTION

You can now configure an M500 so it will always trigger the cabin camera to start recording automatically if the AI detects a person in the backseat. To configure this feature:

  1. Navigate to the Admin tab.

  2. Select the Devices pane.

  3. Click the Device Profiles section. 

  4. Click Go to profile next to the relevant M500 profile.

  5. Click the Device tab.

  6. In the Artificial Intelligence (AI) section, check the Include Cabin Camera on Human Form Detection box.

  7. If the Allow Officer Override of Human Form Detection box is checked, officers in the field can choose whether the cabin camera stream is included in the event when the AI detects a person in the backseat. If the box is not checked, officers cannot override the automatic cabin camera recording.

  8. Click Save settings.


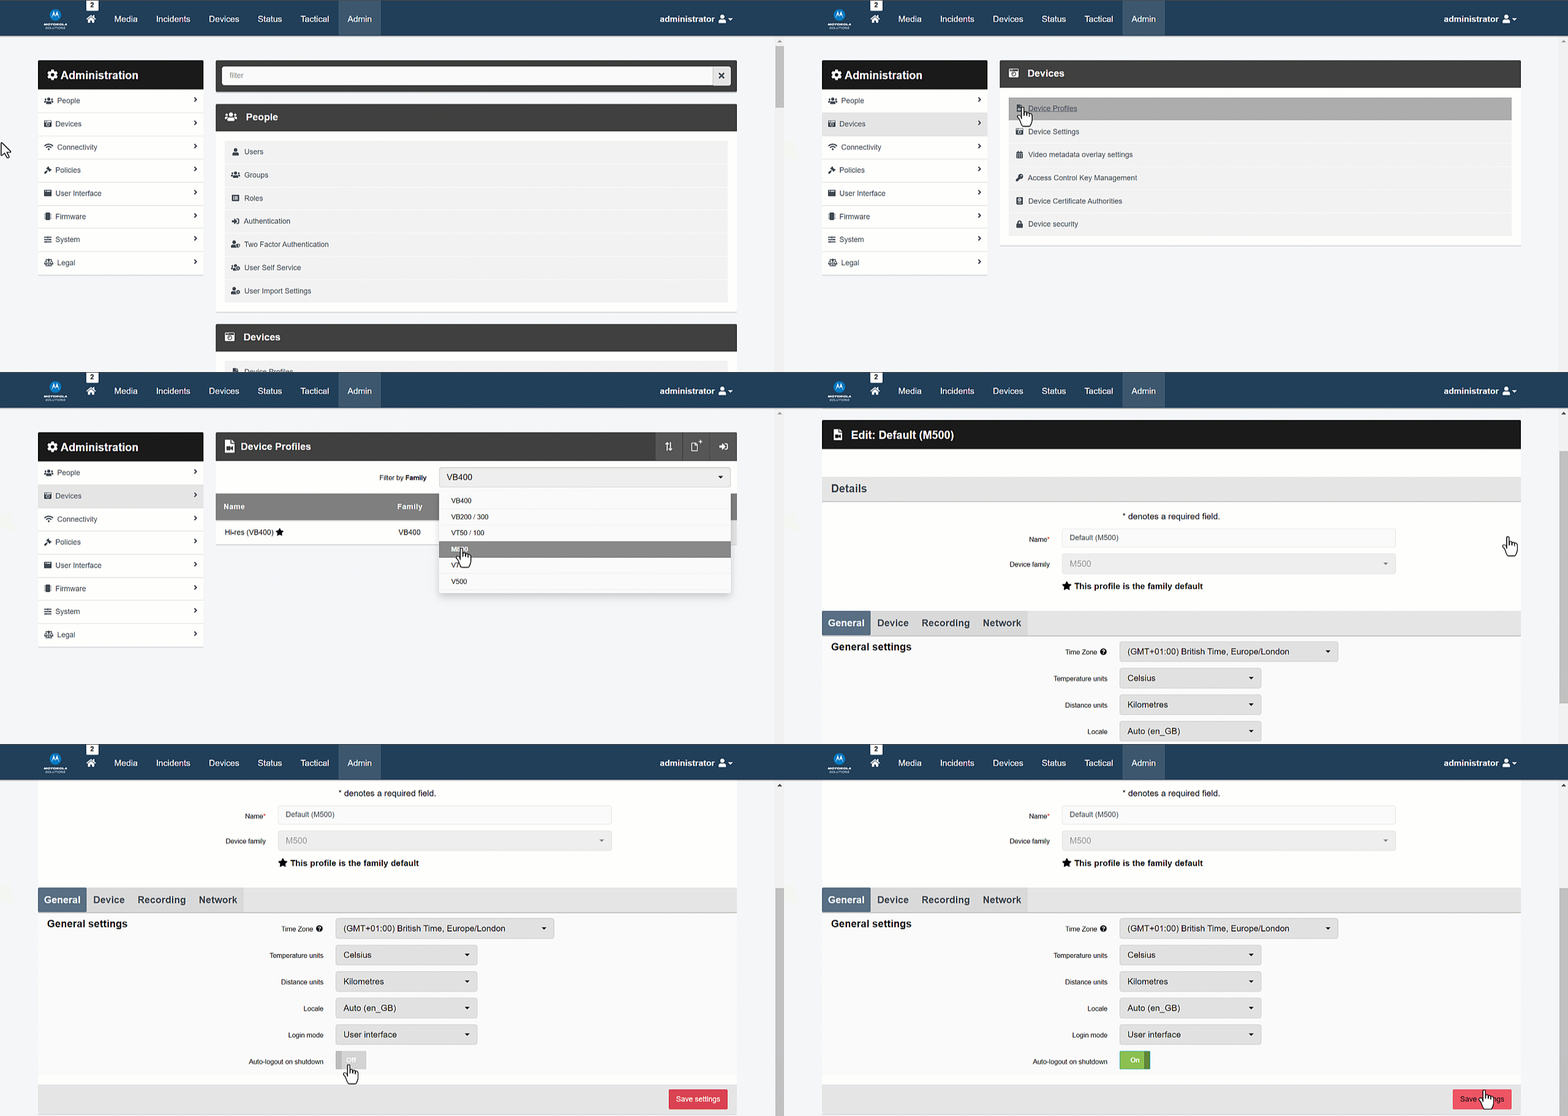
AUTOMATIC M500 LOGOUT UPON SHUTDOWN

With this update, you can choose whether an operator is automatically logged out of an M500 when it shuts down. To configure this feature:

  1. Navigate to the Admin tab.

  2. Select the Devices pane.

  3. Click the Device Profiles section. 

  4. Click Go to profile next to the relevant M500 profile.

  5. Click the General tab.

  6. Set Auto-logout on shutdown to On.

  7. Click Save settings.


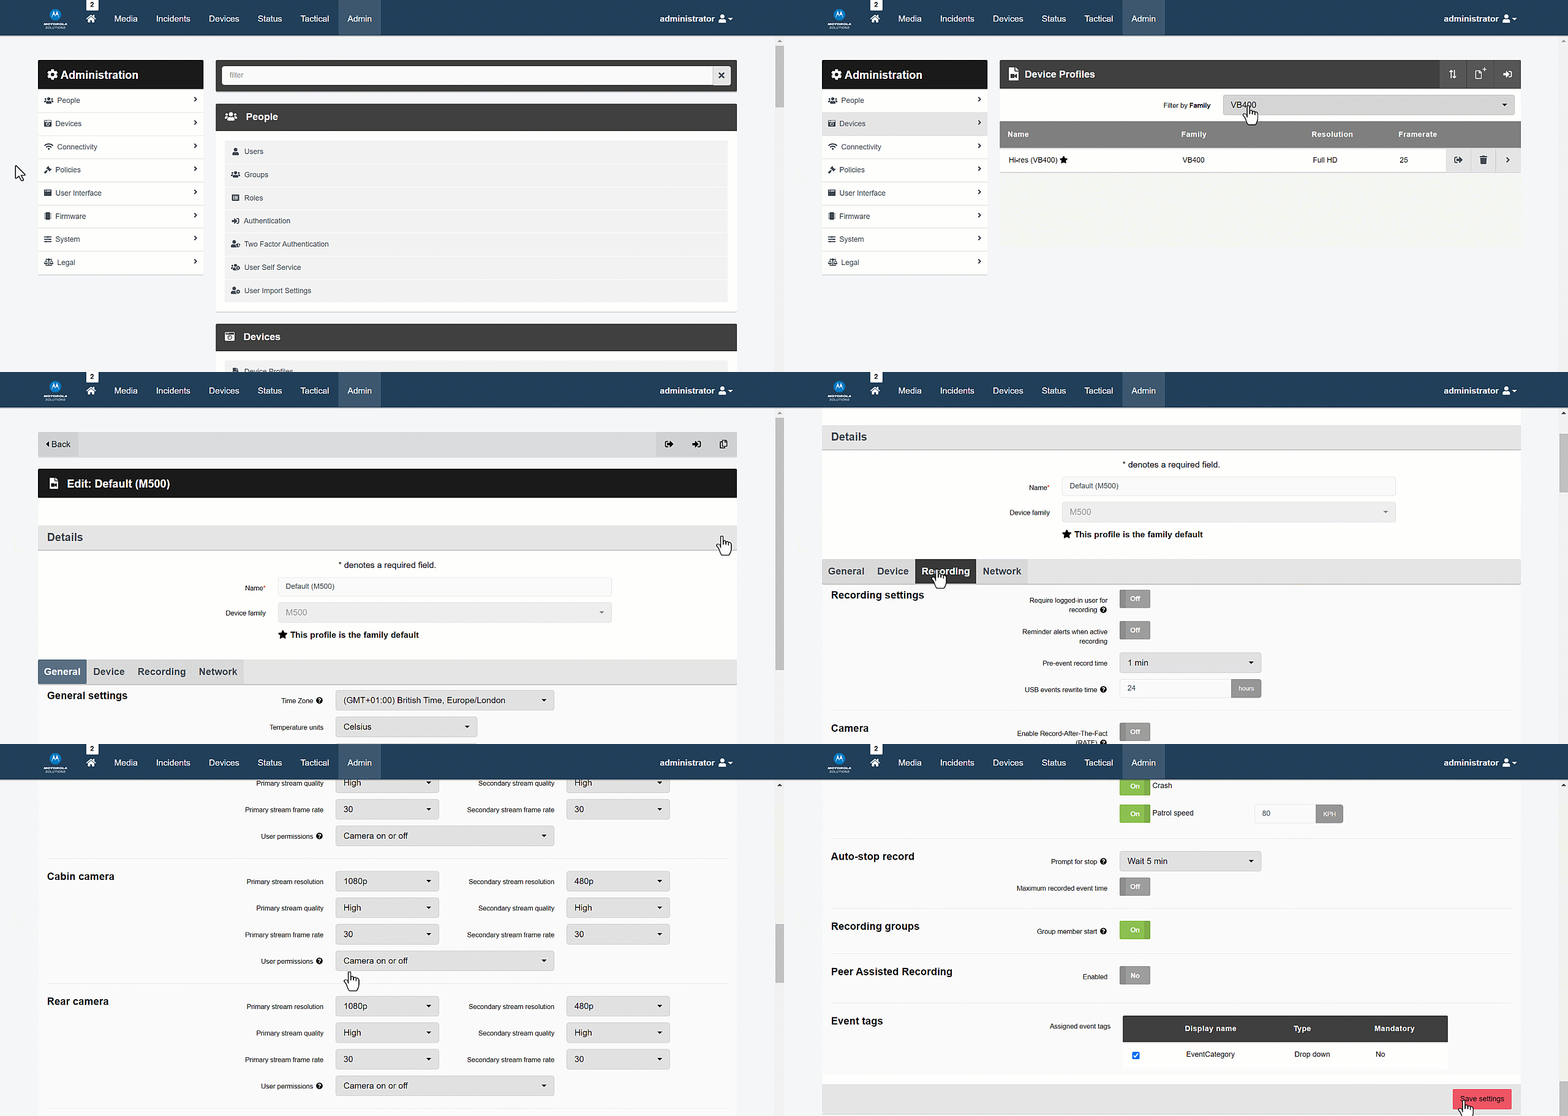
MANDATORY M500 LOGIN

In VideoManager 24.2, it is possible to configure an M500 so operators can only start recording once they have logged in. To configure this feature:

  1. Navigate to the Admin tab.

  2. Select the Devices pane.

  3. Click the Device Profiles section. 

  4. Click Go to profile next to the relevant M500 profile.

  5. Click the Recording tab.

  6. Set Require logged-in user for recording to On.

  7. Click Save settings.

NEW IN VIDEOMANAGER 24.1 (q1 2024)

VideoManager 24.1 introduces in-car video system live streaming, and additional body camera customisation options.

M500 LIVE-STREAMING

You can now live stream footage from an M500 in-car video system to VideoManager. You can also select which camera to watch, and which mic to listen to, from the livestream page. To enable M500 live streaming:

  1. Navigate to the Admin tab.

  2. Select the Devices pane.

  3. Click the Device Profiles section. 

  4. Click Go to profile next to the relevant M500 profile.

  5. Click the Network tab.

  6. From the Enable streaming dropdown, select either Location only or Location and live streaming.

💡 If you select Location and live streaming, you can choose whether users can trigger the M500 to start livestreaming from VideoManager, even when it is not recording.

7. Click Save settings.


VB400 STANDBY CUSTOM LED PATTERN

In VideoManager 24.1, it is possible to customise the LED colour and pattern used when the VB400 is in standby.

  1. Navigate to the Admin tab.

  2. Select the Devices pane.

  3. Click the Device Profiles section. 

  4. Click Go to profile next to the relevant VB400 profile.

  5. In the Notifications & Alarms section, set Customise LED patterns to On.

  6. From the Standby LED pattern dropdown, select the LED behaviour for VB400 body cameras in standby.

  7. Click Save settings.

NEW IN VIDEOMANAGER 17.2

VideoManager 17.2 introduces improvements to in-car video system architecture, and additional security enhancements for internal incident sharing. 

M500 ROAMING

You can now enable your M500 in-car video systems to “roam” between different instances of VideoManager in a site/centre configuration. This enables architecture which is distributed geographically over a large area; an M500 can be assigned at one location, then offload footage or accept new configuration at another. To enable M500 roaming:

  1. Navigate to the Admin tab.

  2. Select the Connectivity pane.

  3. Click the Configuration Replication section. 

  4. Set Roaming, Users, Device profiles and User-defined Fields to On.

  5. Click Save settings.


INCIDENT SHARE REASONS

With VideoManager 17.2, you can prompt users to enter a reason for sharing an incident internally. This reason is audited, which discourages inappropriate sharing and enables administrators to confirm that organisational procedures are being followed correctly. To enable incident share reasons:

  1. Navigate to the Admin tab.

  2. Select the Policies pane.

  3. Click the User-defined Share Reason Fields section.

  4. Click Create field.

From now on, whenever a user tries to share an incident with another user on VideoManager, they will first be prompted to enter a reason for sharing it. Filter the audit log by the INCIDENT_ADD_SHARE event to view all share reasons.

💡 If users should be required to answer multiple questions when sharing an incident, simply add as many new fields as necessary.

NEW IN VIDEOMANAGER 17.1

VideoManager 17.1 introduces a new integration between the VB400 body-worn camera and select models of Motorola Solutions MOTOTRBO radios, including the R7 model. This release also adds the ability to see the last location of your VB400s, Record-After-the-Fact© support for M500 in-car video systems, and enhancements to VideoManager time zone and language pack behaviour.

MOTOTRBO RADIO INTEGRATION

You can now trigger a VB400 body-worn camera to start recording immediately when a paired MOTOTRBO radio enters an emergency state (either due to Fall Alert or Lone Worker). For an overview of the integration, please see this video (for North America) or this video (for the rest of the world). For more detailed information about enabling and configuring the integration, please see this document on the LXP.


FIND MY VB400 OR M500

With VideoManager 17.1, you can see the most recent location of any GPS- and WiFi-enabled VB400 and M500s in their details pane. 

  1. Navigate to the Devices tab.

  2. Select the Search Devices pane.

  3. Click View details next to the relevant device.

  4. Scroll down to the Location section. The device's last location will be shown on the map.


RECORD-AFTER-THE-FACT© SUPPORT FOR M500 IN-CAR VIDEO SYSTEMS

VideoManager now supports Record-After-The-Fact© (RATF) for M500 in-car video systems; this means you can retrieve footage days after an incident occurred, even if the M500 was not recording at the time. Please note - this integration is currently not supported in North America. To enable RATF:

  1. Navigate to the Admin tab.

  2. Select the Device Profiles pane.

  3. Click Go to profile next to the relevant M500 profile.

  4. In the Recording tab, set Enable Record-After-The-Fact© to On.

  5. Click Save settings.

ENHANCED TIMEZONE SUPPORT

VideoManager now distinguishes between a system timezone (where VideoManager’s server is hosted), DockController time zones (where DockControllers and connected devices are located) and device profile time zones. The system time zone will control report times and bandwidth rules, while the DockController or device profile time zones will control video and filename metadata.

To set VideoManager’s time zone:

  1. Navigate to the Admin tab.

  2. Select the System pane.

  3. Click the System Time Zone section.

  4. Select a time zone from the Time Zone dropdown, and click Save settings.


To set a DockController’s time zone:

  1. Navigate to the Devices tab.

  2. Select the DockControllers pane.

  3. Click View details next to the relevant DockController.

  4. In the Device settings section, choose a time zone from the Time Zone dropdown, and click Save settings.


To set a device profile’s time zone:

  1. Navigate to the Admin tab.

  2. Select the Devices pane.

  3. Click the Device Profiles section.

  4. Click Go to profile next to the relevant device profile.

  5. In the Recording behaviour section, choose a time zone from the Time Zone dropdown, and click Save settings


💡 For more information about timezones, please see the Admin guide.


CUSTOM FIELD LOCALISATIONS

You can now set multiple, locale-specific display names for custom media and incident fields. This ensures that, if the user’s session language differs from VideoManager’s server language, they will see the custom fields in their preferred language. To do so:

  1. Ensure your session is in a different language to VideoManager’s team by navigating to Admin > User Interface > Language.

  2. Navigate to the Admin tab.

  3. Select the Policies pane.

  4. Click the User-defined Media Fields or User-defined Incident Fields section.

  5. Click Edit field next to the relevant field.

  6. Add the localised display name.

  7. Click Save settings.

NEW IN VIDEOMANAGER 16.2

VideoManager 16.2 introduces the VB SmartControl mobile app, available on both Android and iOS. This app enables you to securely review and categorize VB400 footage from the moment it’s been captured. VideoManager 16.2 also adds minor enhancements to VB400 recording behaviour.

VB SMARTCONTROL APP

Any organization with at least one VB400 device licence can now download and use VB SmartControl for free. For more information on downloading and setting up VB SmartControl, please see this document (for North America) or this document (for the rest of the world).


PHOTO CAPTURE

You can now configure your VB400s to capture a still image automatically when a bookmark is placed in a recording. To enable photo capture:

  1. Navigate to the Admin tab.

  2. Select the Devices pane.

  3. Click the Device Profiles section.

  4. Click Go to profile next to the device profile which will be edited.

  5. Scroll down to the Recording behaviour section.

  6. Set Capture image on bookmark to Yes.

  7. In the Controls section, ensure there is an action which will prompt the VB400 to capture a bookmark in the video it is recording.

Now, whenever a VB400 with this device profile is prompted to place a bookmark, the camera will also automatically take a screenshot of the video. The screenshot will be uploaded to VideoManager as a separate JPEG.

NEW IN VIDEOMANAGER 16.1

VideoManager 16.1 introduces new features for body-worn camera management and general system settings.

RECORD FROM UNDOCK

You can now configure your VB400 to record from the moment it is undocked. You can also determine whether the operator has the ability to stop recording when their VB400 is in this mode.

To enable this setting:

  1. Navigate to the Admin tab.

  2. Select the Devices pane.

  3. Click the Device Settings section. 

  4. Click Go to profile next to the VB400 profile which will be edited.

  5. Scroll down to the Recording behaviour section.

  6. From the Recording policy dropdown, determine whether the VB400 will start recording automatically from undock, or must be manually prompted to start recording. The options are as follows:

    • Controlled by gesture - the VB400 will not start recording automatically. The operator can prompt it to record using the gesture determined in the Controls section.

    • While not docked - the VB400 will start recording automatically, as soon as it has been undocked. It will continue to record until it runs out of battery, or is redocked again. The user cannot stop recording manually, even if gesture(s) have been configured in the Controls section.

    • Start once on undocking, then gesture controlled - the VB400 will start recording automatically, as soon as it has been undocked. The operator can then stop - and start - recording manually using the gesture(s) determined in the Controls section. 

  7. Click Save profile.

MULTIPLE WEBSERVERS 

You can now set different addresses for handling different types of traffic from, and into, VideoManager. This may be necessary for security or network level monitoring reasons.

For more information on setting up multiple addresses for VideoManager, please see the VideoManager Public and Listen Addresses Explained technical paper on the Learning Experience Portal.

NEW IN VIDEOMANAGER 16.0

VideoManager 16.0 introduces new features for digital media handling, body-worn camera management and in-car video system management.

M500 IN-CAR VIDEO SYSTEM SUPPORT

VideoManager now supports the Motorola Solutions M500 in-car video system. Please note - this integration is currently not supported in North America.

This means you can configure your M500s, and view the footage they record, natively on VideoManager. For more information on setting up your M500s within VideoManager, please see the M500 and VideoManager Explained technical paper on the Learning Experience Portal.

PASSWORD-PROTECTED INCIDENT LINKS 

You can now add an extra level of security to your incident links (including custom links) by setting a password which the recipient of the link must enter in order to view the incident.

To add a password to an incident link:

  1. Navigate to the Incidents tab.

  2. Click View incident next to the incident which will be shared.

  3. In the Links section, click Create new link

  4. Enter the relevant information. In the Password (optional) field, enter the password for this incident link.

  5. Click Confirm

💡 VideoManager will show you the password for a link when you click Show link to copy. However, the password is not included in the default email message to your recipient; you must send it in a separate email.

DOCKCONTROLLER OFFLOAD GROUPS

You can now configure a DockController so that the owner of all footage it sends to VideoManager is automatically set to a nominated group or user. This may be useful if you have a distributed site architecture, and certain users should be able to view all footage uploaded to their instance of VideoManager (but only their instance of VideoManager). 

To configure a DockController offload group for a DockController:

  1. Navigate to the Devices tab.

  2. Select the DockControllers pane, and filter the DockControllers as necessary.

  3. Click View details next to the relevant DockController.

  4. Scroll down to the Device settings section.

  5. In the Auto change owner field, enter the name of a user or group. 

    💡 VideoManager will suggest names which match the name entered in this field. If no names are suggested, the user or group does not exist.

    💡 This does not affect the operator who recorded the video; it only changes the owner once the video has been uploaded to VideoManager.

  6. Click Save settings

vb400 wifi wpa2/eap authentication 

Recent revisions of the VB400 now support WiFi authentication using WPA2/PEAP-MSCHAPv2.

NEW IN VIDEOMANAGER 15.3

VideoManager 15.3 introduces the ability to put your VB400 into safety mode automatically, shortly after it has been undocked. 

SAFETY MODE UPON UNDOCKING

Since VideoManager 15.0, it has been possible to manually put a VB400 into safety mode using a preconfigured gesture. While in safety mode, VB400s will not respond to any button presses until they are prompted to exit safety mode using another preconfigured gesture. This mode saves battery life; it is ideal if the operator knows their VB400 will not be needed at short notice, or if the way you use the VB400 means that it might be stored for a period after being assigned.

Now, it is possible to configure a VB400 ahead of time, so it will enter safety mode automatically after it has been undocked - this means that the operator does not need to remember to manually trigger safety mode. 


To turn on safety mode upon undocking:

  1. Navigate to the Admin tab.

  2. Select the Devices pane.

  3. Click the Device Profiles section.

  4. Click Go to profile next to the relevant profile.

  5. Scroll down to the Power Management section.

  6. Set Enter safety mode if idle after undocking to On

  7. In the Controls section, ensure that there is a gesture which will prompt the VB400s in this profile to exit safety mode.

 ⚠ If a gesture to exit safety mode is not configured, VB400s in this profile will be completely inert and unable to record footage.                                                                                                                                                                                                                                                                                                                                                                             8.Click Save settings.

⚠ The VB400 does not enter safety mode instantly on undocking; If the VB400 starts recording (e.g. by gesture, or peer-assisted-recording) within 10 seconds after it has been undocked, or is configured to pre-record immediately after being undocked, then it will not enter safety mode.


NEW IN VIDEOMANAGER 15.2

VideoManager 15.2 introduces new features for both digital media handling and body-worn camera management.

TRANSCRIPTION

For ease of review, you can edit captions for videos within the incident editor itself, instead of having to create and import an external .VTT file. For more information about using transcription, please see this document.


VB400 AUDIO MUTE & UNMUTE

To conform to local laws and regulations, you can configure whether audio is muted by default. VB400s can be also prompted to start and stop capturing audio based on specific gestures configured in their device profile. Audio is independent of video, so VB400s will continue recording video even when audio is muted.

To mute audio by default:

  1. Navigate to the Admin tab.

  2. Select the Devices pane.

  3. Click the Device Profiles section.

  4. Click Go to profile next to the profile which will include audio mute and unmute gestures.

  5. Scroll down to the Recording Behaviour section.

  6. If Audio initially muted is set to Yes, then VB400s will be muted by default when they are first undocked. Operators must then manually enable audio recording.

  7. Click Save settings.


To configure which gestures mute and unmute audio:

  1. Navigate to the Admin tab.

  2. Select the Devices pane.

  3. Click the Device Profiles section.

  4. Click Go to profile next to the profile which will include audio mute and unmute gestures.

  5. Scroll down to the Controls section.

  6. Next to the relevant button and gesture, select one of the following options from the dropdown:

    1. Unmute audio: the VB400 will start recording audio. If it was already recording audio, this gesture will do nothing.

    2. Mute audio: the VB400 will stop recording audio. If it was not already recording audio, this gesture will do nothing.

    3. Toggle mute audio: the VB400’s audio recording state will change. If it was already recording audio, it will stop. If it was not already recording audio, it will start.

  7. Add as many gestures as necessary.

  8. Click Save settings.


⚠ If your VB400s are not configured to record audio, neither of these settings will have any effect.


VB400 AUDIO PROFILES

To improve the audio quality in evidential footage, VB400s can have an “indoor” or “outdoor” audio configuration, as dictated by their device profile. An “outdoor” configuration will maintain the normal recording volume level, while an “indoor” configuration will increase it. By default, device profiles use the “outdoor” profile.

To use this feature:

  1. Navigate to the Admin tab.

  2. Select the Devices pane.

  3. Click the Device Profiles section.

  4. Click Go to profile next to the profile which will include audio mute and unmute gestures.

  5. Scroll down to the Audio Settings section.

  6. From the Audio Profiles dropdown, select the relevant option.

  7. Click Save settings


If your VB400s are not configured to record audio, neither of these profiles will have any effect


VB COMPANION: UPDATES TO STREAMING & LOCATION

Using VB Companion, you can now stream footage from your VB400s to VideoManager directly over your phone’s internet connection. This makes it even easier to configure live streams, because you do not need to create a WiFi profile or configure a hotspot. 

You can also use your phone as a proxy for your VB400’s location, for a more accurate GPS location when viewing a live location on the Tactical VideoManager map. 

To enable either feature:

  1. Navigate to the Admin tab.

  2. Select the Devices pane.

  3. Click the Device Profiles section.

  4. Click Go to profile next to the profile which will include audio mute and unmute gestures.

  5. Scroll down to the VB Companion Settings section.

  6. Set Enable location reporting and/or Enable streaming via app to On

  7. Click Save settings


MEDIA FIELD VISIBILITY

You can configure which media fields (both built-in and user-defined) are visible from the Media tab’s search results pane when it is in List mode. To do so: 

  1. Navigate to the Admin tab.

  2. Select the Policies pane.

  3. Click the User-defined Media Fields section.

  4. Click ⏐⏐ Field Layouts in the top right-hand corner.

  5. Click ➕ to add media fields to the Small (phone), Medium (tablet) or Large (PC) tables.


PLAY ALL FUNCTION

You can view multiple pieces of media one after another without needing to start playing each one manually. To do so:

  1. Navigate to the Media tab.

  2. Filter the media as necessary, and click Find media

  3. In the top right-hand corner, ensure List has been selected.

  4. Click Play all


TERMINOLOGY: VIDEO > MEDIA

The Videos tab has been renamed to Media, to better reflect the types of files that VideoManager can process.